This is the best chocolate chip cookie recipe I have found. I used to use a different one, but moving to high altitude wreaked havoc on my cookies, and it took a while to find a new, BETTER recipe. The secret isn't so secret anymore... cornstarch! Perfect, fluffy cookies. With that said, the batch made on this post weren't the best I made (appearance-wise, they always taste great), and they still look pretty darn good!
Anyway, this recipe is like fool-proof. I will admit that I decreased the amount of chocolate chips, and that IS saying something (I'm always for more chocolate). It was just a little too much! They were rattling around in the bowl with nothing to stick to!
Recipe:
Chewy Chocolate Chip Cookies
Ingredients:
3/4 cup Unsalted butter, softened
3/4 cup Brown Sugar
1/4 cup Granulated Sugar
1 Large Egg
2 tsp. Vanilla
2 cups Flour
2 tsp. Cornstarch
1 tsp. Baking Soda
1/2 tsp. Salt
3/4 cup Chocolate Chips
Directions:
1. Preheat oven to 350. Line pan with parchment paper.
2. Cream butter with sugars and add vanilla. Once creamy, add egg and mix.
3. Add dry ingredients (flour last) and mix until combined.
4. Add chocolate chips and place in tablespoon-fulls on pan (makes about 24 cookies).
5. Bake for 8-10 minutes.
Friday, June 6, 2014
Wednesday, May 28, 2014
Daring Baker's Challenge: May - PÃO DE QUEIJO
So I said I was going to do it and I did it! I'm officially a "daring" baker! I didn't join until now, though, because of my foreign travel plans. I figured I needed to wait until I had time to commit. And so May is the first official month as part of the challenge, for me!
This month was "PÃO DE QUEIJO" and, honestly, it was a complete failure for me. Okay, maybe not a COMPLETE failure. It sounded delicious! I love bread. I love cheese! What else could a girl want? The pictures showed delightfully fluffy scone-like breads. Looked amazing.
So I ordered me some Tapioca flour online and, once it arrived, I followed the provided recipe and baked! It was an interesting experience, I'll admit. It seemed to progress according to the instructions. But my little scone-thingies didn't puff up in the oven AT ALL. They remained hard little golf balls. So maybe I did something wrong--maybe?
Don't get me wrong. They tasted fine. Not great, but not bad. They were edible. They were okay. But they weren't anything I was going to keep around after they cooled, and most made their way into the trash. It was disappointing... they are highly popular and I imagine quite yummy when made right!
Regardless, here is the recipe I was provided. Maybe you'll have better luck (but if I were you, I'd find some at a store and eat them there!):
Recipe:
PÃO DE QUEIJO
Ingredients:
4 cups Tapioca Starch
1 cup Whole Milk
2 3/4 Tbsp. Butter
1 tsp. Salt
3 cups Monterey Jack Cheese
1-3 Large Eggs
Directions:
1. Heat milk, butter, and salt in small sauce pan until it boils. Remove from heat and set aside.
2. Pour hot milk mixture over sifted tapioca starch and blend with a fork (it will form a lumpy mixture). Break down lumps and continue to stir until just warm.
3. Preheat oven to 400. Add the grated cheese and mix in with your hands.
4. Add the eggs one at a time, mixing with your hands, until dough comes together in a soft but pliable dough. It can be slightly sticky.
5. Form balls with dough and placed on lined baking sheets. Bake for 25 minutes or until just brown on the bottom. Do not over bake.
This month was "PÃO DE QUEIJO" and, honestly, it was a complete failure for me. Okay, maybe not a COMPLETE failure. It sounded delicious! I love bread. I love cheese! What else could a girl want? The pictures showed delightfully fluffy scone-like breads. Looked amazing.
So I ordered me some Tapioca flour online and, once it arrived, I followed the provided recipe and baked! It was an interesting experience, I'll admit. It seemed to progress according to the instructions. But my little scone-thingies didn't puff up in the oven AT ALL. They remained hard little golf balls. So maybe I did something wrong--maybe?
Don't get me wrong. They tasted fine. Not great, but not bad. They were edible. They were okay. But they weren't anything I was going to keep around after they cooled, and most made their way into the trash. It was disappointing... they are highly popular and I imagine quite yummy when made right!
Regardless, here is the recipe I was provided. Maybe you'll have better luck (but if I were you, I'd find some at a store and eat them there!):
Recipe:
PÃO DE QUEIJO
Ingredients:
4 cups Tapioca Starch
1 cup Whole Milk
2 3/4 Tbsp. Butter
1 tsp. Salt
3 cups Monterey Jack Cheese
1-3 Large Eggs
Directions:
1. Heat milk, butter, and salt in small sauce pan until it boils. Remove from heat and set aside.
2. Pour hot milk mixture over sifted tapioca starch and blend with a fork (it will form a lumpy mixture). Break down lumps and continue to stir until just warm.
3. Preheat oven to 400. Add the grated cheese and mix in with your hands.
4. Add the eggs one at a time, mixing with your hands, until dough comes together in a soft but pliable dough. It can be slightly sticky.
5. Form balls with dough and placed on lined baking sheets. Bake for 25 minutes or until just brown on the bottom. Do not over bake.
Monday, May 19, 2014
Challenging Myself - 2014 Dessert Challenge
So I have noticed that I'm still terrible about blogging. Here's the thing though... I'm trying new recipes all the time still! So here's to my goal to get back into putting the stories of my successes/failures on the blog. I decided the best way to do this is to institute a challenge again. I liked the Cheesecake Challenge. I royally sucked at it after my son was born, but it was FUN.
In an effort to make this a productive endeavor, though (and because I'm actually in the process of losing that 15 pounds--halfway and trying to maintain...), I'm going to make a more flexible "Dessert Challenge." I know, it doesn't sound as cool, at all. But it's probably more practical, since I avoid cheesecake like the plague (it's too good to give away and too fattening to eat all the time!).
So I've decided to make my own "Baker's Challenge." The goal is to make one of these desserts a month, on average (at least). I have 7 desserts here, enough for one a month from June-December. I even selected a wide variety of treats to suit all sorts of occasions. Let's see if I can manage it!
1. Chocolate Chess Pie

2. Tiramisu Sandwich Cookies

3. German Dark Rye Bread

4. No-Bake Nutella Cheesecakes

5. Cannoli Cupcakes

6. Chocolate Chip Peanut Butter Oatmeal Skillet Cookie

7. Chocolate Peanut Butter Pie
In an effort to make this a productive endeavor, though (and because I'm actually in the process of losing that 15 pounds--halfway and trying to maintain...), I'm going to make a more flexible "Dessert Challenge." I know, it doesn't sound as cool, at all. But it's probably more practical, since I avoid cheesecake like the plague (it's too good to give away and too fattening to eat all the time!).
So I've decided to make my own "Baker's Challenge." The goal is to make one of these desserts a month, on average (at least). I have 7 desserts here, enough for one a month from June-December. I even selected a wide variety of treats to suit all sorts of occasions. Let's see if I can manage it!
1. Chocolate Chess Pie
2. Tiramisu Sandwich Cookies
3. German Dark Rye Bread
4. No-Bake Nutella Cheesecakes
5. Cannoli Cupcakes
6. Chocolate Chip Peanut Butter Oatmeal Skillet Cookie
7. Chocolate Peanut Butter Pie
Chocolate Chip Bars
I already have myself a go-to chocolate chip bar, and this is a slight variation on that, but it was a recipe I decided to try. And I did... it was pretty good, although I'll confess that I think it is much better right out of the oven. However, I do live in a very dry climate and things dry out easily (it was too dry for me on day 2... maybe if I had done a better job wrapping it?).
Anyway, these are yummy and chewy right out of the oven, and you'll eat more than you should!
Recipe:
Chocolate Chip Bars
adapted from Mel's Kitchen Cafe
Ingredients:
2 1/8 cups Flour
1/2 tsp. Baking Soda
12 Tbsp. Butter, melted and cooled slightly
1 cup Brown Sugar
1/2 cup Sugar
1 Egg
1 Egg Yolk
2 tsp. Vanilla
2 1/4 cups Flour
2 cups Chocolate Chips
Directions:
1. Preheat oven to 325. Line pan with foil or spray.
2. Whisk together melted butter and sugars until combined, and then add egg and yolk.
3. Add vanilla and baking soda. Fold in flour until just combined (do not over mix).
4. Fold in chocolate chips and smooth into pan.
5. Bake for 24-28 minutes. Cool to room temperature (or eat them hot, how I like them).
Anyway, these are yummy and chewy right out of the oven, and you'll eat more than you should!
Recipe:
Chocolate Chip Bars
adapted from Mel's Kitchen Cafe
Ingredients:
2 1/8 cups Flour
1/2 tsp. Baking Soda
12 Tbsp. Butter, melted and cooled slightly
1 cup Brown Sugar
1/2 cup Sugar
1 Egg
1 Egg Yolk
2 tsp. Vanilla
2 1/4 cups Flour
2 cups Chocolate Chips
Directions:
1. Preheat oven to 325. Line pan with foil or spray.
2. Whisk together melted butter and sugars until combined, and then add egg and yolk.
3. Add vanilla and baking soda. Fold in flour until just combined (do not over mix).
4. Fold in chocolate chips and smooth into pan.
5. Bake for 24-28 minutes. Cool to room temperature (or eat them hot, how I like them).
Thursday, February 20, 2014
Back in the Kitchen
I found this amazing website today called "The Daring Kitchen." It's just a group of bakers/cooks that each month take on a challenge. I love the concept! And I want to do it... but I am going to try to ease back into my blog, first.
So, life happened. I was writing up until late summer of 2012. At the end of 2012, my son was born. Let me just say, adjusting to two was a challenge for me! The last thing I had time for was blogging/baking/trying new things.
But now my little guy is over a year and I think we have our rhythm. Moreover, I'm getting back into meal planning and trying new recipes. Unfortunately, I'm STILL trying to lose 15 pounds. That hadn't changed since the inception of this blog. However, I am already 5 pounds against my goal, so it's going well! Which means, of course, I can't bake too much or too often. Although my coworkers like my diet--it means they get quite a bit of my left overs.
So here's to a new beginning. I'm not going to take on the Cheesecake Challenge again, yet. I even tried a few of those other recipes and didn't blog about them. But right now, it's baby steps into blogging. If I get going, I'll set a challenge. My goal is to join the Daring Bakers, but I need to make sure I can handle it, first!
Here we go!
So, life happened. I was writing up until late summer of 2012. At the end of 2012, my son was born. Let me just say, adjusting to two was a challenge for me! The last thing I had time for was blogging/baking/trying new things.
But now my little guy is over a year and I think we have our rhythm. Moreover, I'm getting back into meal planning and trying new recipes. Unfortunately, I'm STILL trying to lose 15 pounds. That hadn't changed since the inception of this blog. However, I am already 5 pounds against my goal, so it's going well! Which means, of course, I can't bake too much or too often. Although my coworkers like my diet--it means they get quite a bit of my left overs.
So here's to a new beginning. I'm not going to take on the Cheesecake Challenge again, yet. I even tried a few of those other recipes and didn't blog about them. But right now, it's baby steps into blogging. If I get going, I'll set a challenge. My goal is to join the Daring Bakers, but I need to make sure I can handle it, first!
Here we go!
Wednesday, August 15, 2012
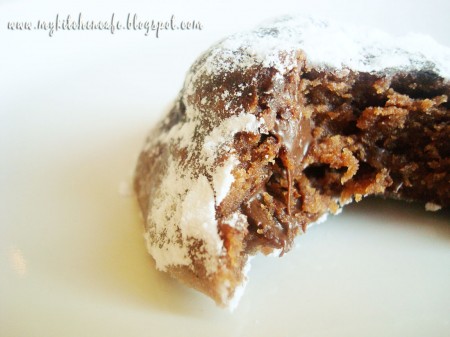
Chocolate Truffle Cookies
These are amazing. Amazing. They are like chocolate truffles. I know, that's what they're called. But seriously, they are! So soft and smooth... so chocolaty....
They are delish. That's all I have to say.
Recipe:
Chocolate Truffle Cookies
from Mel's Kitchen Cafe
Ingredients:
1 1/4 cup Butter, room temperature
2 cups Powdered Sugar
1/3 cup Cocoa
1/4 tsp. Salt
1/4 cup Sour Cream
1 tsp. Vanilla
2 1/4 cups Flour
2 cups Chocolate Chips
1/3 cup Cocoa for rolling
1/3 cup Powdered Sugar for Sprinkling
Directions:
1. Preheat oven to 325. Line pans with parchment paper.
2. Cream the butter and sugar. Strain in the cocoa and salt into the butter mixture.
3. Beat in sour cream and vanilla. Blend in flour and add chocolate chips.
4. Shape into 1 inch balls (may need to refrigerate first) and roll in cocoa before placing on the pan. Do not flatten.
5. Bake for 10 minutes - DO NOT OVER BAKE. Cool on the baking sheet 3-5 minutes. Once completely cooled, sprinkle with powdered sugar.
| From Mel's Kitchen Cafe |
Recipe:
Chocolate Truffle Cookies
from Mel's Kitchen Cafe
Ingredients:
1 1/4 cup Butter, room temperature
2 cups Powdered Sugar
1/3 cup Cocoa
1/4 tsp. Salt
1/4 cup Sour Cream
1 tsp. Vanilla
2 1/4 cups Flour
2 cups Chocolate Chips
1/3 cup Cocoa for rolling
1/3 cup Powdered Sugar for Sprinkling
Directions:
1. Preheat oven to 325. Line pans with parchment paper.
2. Cream the butter and sugar. Strain in the cocoa and salt into the butter mixture.
3. Beat in sour cream and vanilla. Blend in flour and add chocolate chips.
4. Shape into 1 inch balls (may need to refrigerate first) and roll in cocoa before placing on the pan. Do not flatten.
5. Bake for 10 minutes - DO NOT OVER BAKE. Cool on the baking sheet 3-5 minutes. Once completely cooled, sprinkle with powdered sugar.
Friday, July 27, 2012
Cheesecake Challenge #11: Japanese Cheesecake
Yum! This is a weird kind of cheesecake. It's super light and fluffy. But it's really yummy! Here was the inspiration--see how beautiful it is?
My picture is definitely not a beautiful. I have to confess, actually, the cake was really not attractive. But I made a partial recipe and it's with European measurements, so I had to convert... it was all very experimental. I think it could be beautiful... if I did it better.
It's not chocolate, but it's unique. And the husband says it's the best cheesecake I've made yet. So it's getting 5 stars.
Again, the recipe is converted from European measurements, so it's a little funky.
Japanese Cheesecake
from Green Cilantro
Ingredients:
10.5 oz. Cream Cheese, room temperature
3 Tbsp. Unsalted Butter
3 Large Eggs, separated
1 1/2 Tbsp. Sugar
2 1/2 Tbsp. Cornstarch
2/3 cup Milk
1/4 cup Sugar
Directions:
1. Preheat oven to 350. Line the bottom and sides of a fixed bottom pan with parchment. Put egg whites in freezer until just freezing around the edges. Sift the cornstarch.
2. Melt butter over double boiler. Add cream cheese and whisk.
3. In separate bowl, combine egg yolks and 1 1/2 Tbsp sugar. Add cornstarch.
4. Heat milk to a boil and add egg yolk mixture. Whisk until thickened over a double boiler. Add cream cheese and mix well.
5. Slowly add 1/4 cup sugar to egg whites and beat into a soft meringue. Add 1/4 cup of the meringue to the batter and then fold the rest in.
6. Place cake in water bath and bake 15 minutes. Reduce the temperature to 300 and bake another 25. Let sit in oven (off) for 40 minutes to an hour. Cool before chilling, overnight.
![]() |
| From Green Cilantro |
It's not chocolate, but it's unique. And the husband says it's the best cheesecake I've made yet. So it's getting 5 stars.
Again, the recipe is converted from European measurements, so it's a little funky.
Japanese Cheesecake
from Green Cilantro
Ingredients:
10.5 oz. Cream Cheese, room temperature
3 Tbsp. Unsalted Butter
3 Large Eggs, separated
1 1/2 Tbsp. Sugar
2 1/2 Tbsp. Cornstarch
2/3 cup Milk
1/4 cup Sugar
Directions:
1. Preheat oven to 350. Line the bottom and sides of a fixed bottom pan with parchment. Put egg whites in freezer until just freezing around the edges. Sift the cornstarch.
2. Melt butter over double boiler. Add cream cheese and whisk.
3. In separate bowl, combine egg yolks and 1 1/2 Tbsp sugar. Add cornstarch.
4. Heat milk to a boil and add egg yolk mixture. Whisk until thickened over a double boiler. Add cream cheese and mix well.
5. Slowly add 1/4 cup sugar to egg whites and beat into a soft meringue. Add 1/4 cup of the meringue to the batter and then fold the rest in.
6. Place cake in water bath and bake 15 minutes. Reduce the temperature to 300 and bake another 25. Let sit in oven (off) for 40 minutes to an hour. Cool before chilling, overnight.
Subscribe to:
Posts (Atom)